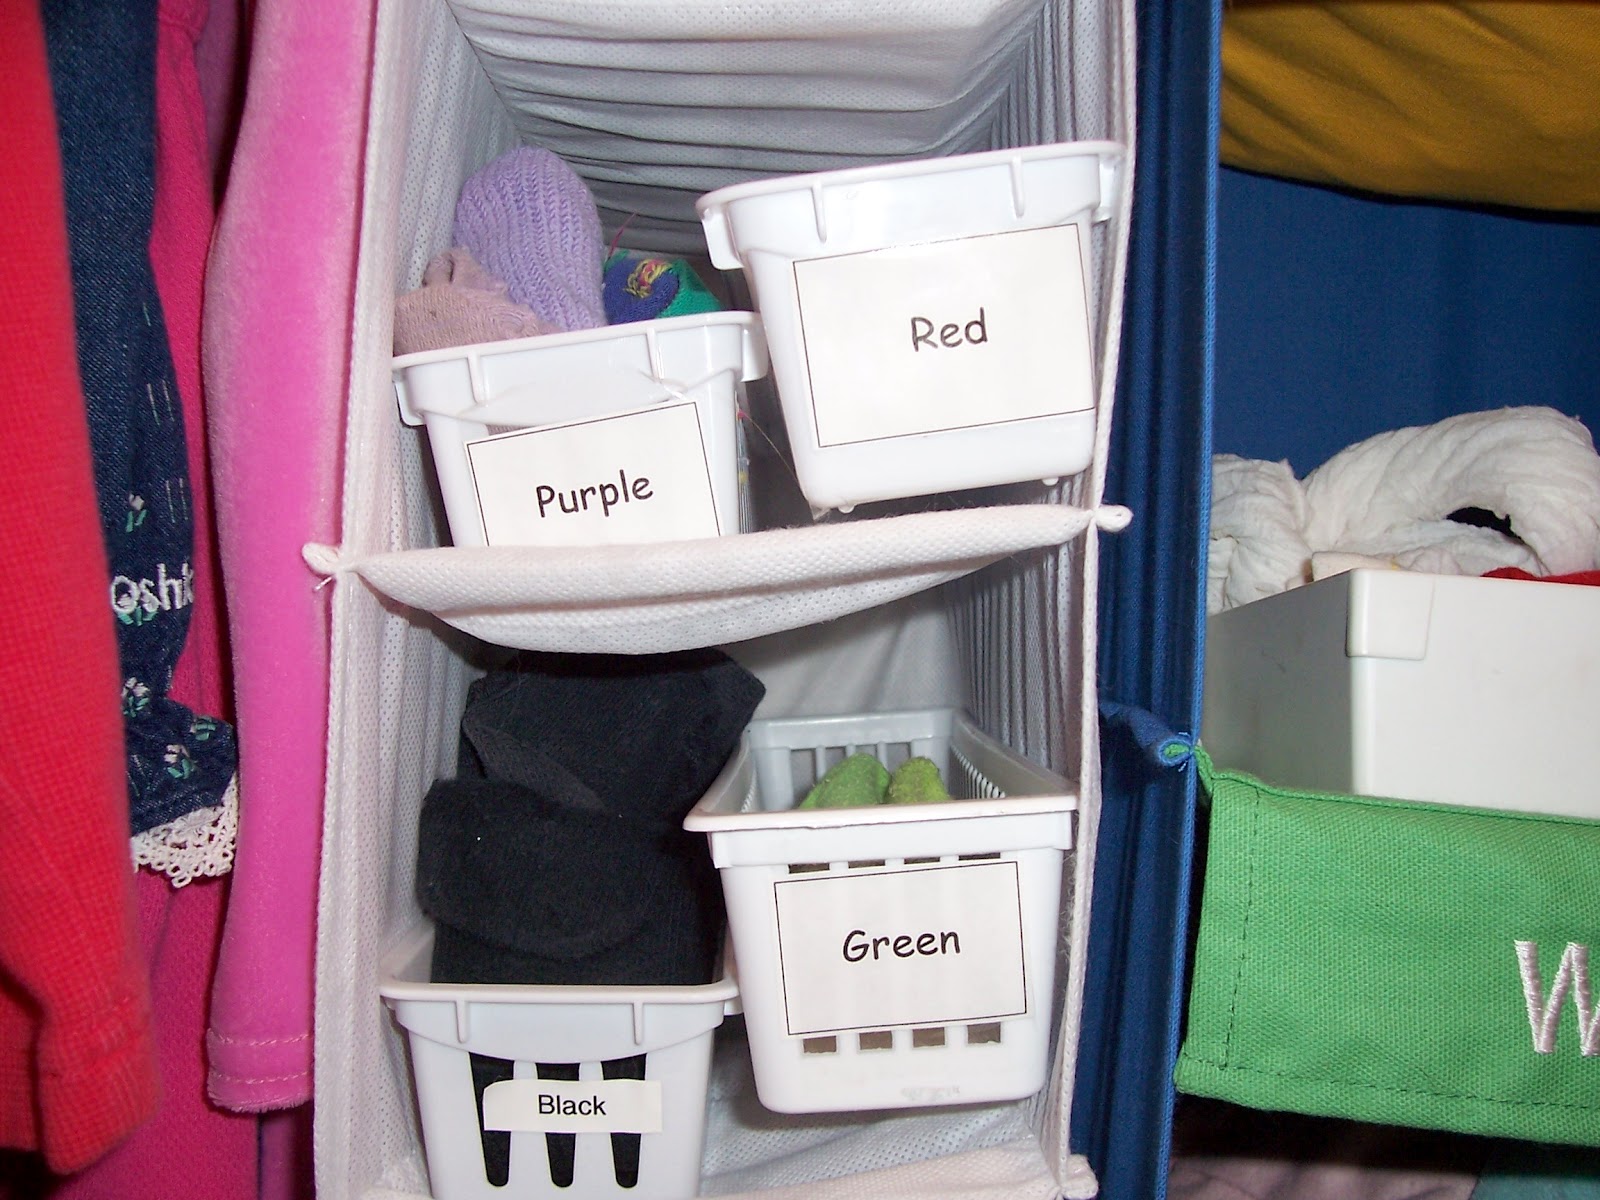
How many times have you found a pair of scissors (or pencils, or cup, or ... you fill in the blank) in the living room and nobody will admit to leaving them there? You don't know who it belongs to because it's just a pair of scissors. We resolved this in our house by having every kid pick a favorite color. Each child needs their own color and the colors should be basic, for instance "blue" and not "sky blue".
Once each child has a color, buy everything possible in each kid's color. Some examples of what we have done:
1. Drinking cups
2. Bath towel and washcloth (no they don't match the bathroom decor. We've learned to deal with it).
3. Pack of school pencils
4. Stapler
5. Paper clips
6. Tape dispenser
7. Pencil boxes for individual sets of Sharpies, markers, etc. (Each pen is color-coded too)
8. Scissors
9. Notebooks
10. Book covers
11. Boxes and bins to store stuff in in their room
12. Lunch containers
13. Travel mugs/cups
Following this color scheme, we can also mark items that normally couldn't be labeled. When we go camping or on a picnic and we go through several water bottles, we use colored pony-tail holders from the dollar store around the neck of the bottle. They are easily slipped on and off as we go through bottles.
When we traveled with younger kids, each of them had a rolling backpack or bin in their color (or with their color ribbons tied to the handle or striped in Duct Tape) to contain all of their stuff in the airplane or car. When we used our travel currency, their assigned poker chip color was their everyday color at home.
Color-coding takes the guess work out of who the "lost" items belong to... if a red stapler is found in the living room with no child in site, anybody who finds it knows to put it on the owner's desk chair (or a parent may confiscate it and know who to charge if they want it back - but that's another post).
Thursday, June 28, 2012
Friday, June 15, 2012
3 scoops = you're done!
When I just couldn't take the question "can I play now?" any more, I came up with the ice cream idea. Each child had 3 things they had to do each day during the summer (that we were home and not running around somewhere) BEFORE they could play outside with friends, turn on the TV, play on the computer, etc. But they really didn't need one more of mom's lists to check off. So I printed 3 scoops for each kid with specifics for their assignments on their color paper. (each child has a designated color for everything from drinking cups to school supplies; helps keep things straight and know quickly who left what out where it didn't belong).

Anyway, I printed the assignments on scoop shaped clip art and then cut a brown ice cream cone from construction paper. With a magnet on the back of each piece, they were stuck on the fridge and ready to go. Each night the scoops are cleared off their cones. Each morning the child puts the scoop on the cone when the assignment has been completed. The word "zones" (chores) is on a red circle for the cherry on top (not pictured - I took the pictures before the cherries were printed). When the 3 things have been done and the cherry put on top, they are free to play on the computer, watch TV or visit with friends.
Each day that they get all 3 scoops completed, they put a star onto the cone. At the end of the summer, we will take the cone with the least amount of stars (want them to encourage each other and make it more of a group project) and there will be some sort of reward in accordance with the numbers. Might be the number of topping scoops they put on frozen yogurt, number of water balloons they get in a water balloon fight, number of cookies or M&Ms they're allowed to pick...we'll come up with something.

Wednesday, June 13, 2012
Preparing for a trip
Packing and Preparing
1. As a scrapbooker, it is easier to pick colors for the pages if the people I have pictures of are in similar colors (as my kids have gotten older, we no longer completely match, but we do try to coordinate in the same colors on the same days). So I pack the same colors in shirts for the whole family for at least the days we'll be taking the majority of pictures. This is also helpful, if God forbid, I should need to describe one of my children to a police officer. I know exactly what they were wearing.
2. Road trips. When going in and out of hotels each night in different cities, I don't want to take a suitcase for everyone in each night (nor is there usually room in the van for so many suitcases). So I have 1 suitcase for the kids and myself with pajamas, toothbrushes, medicines, etc. Anything we'd need overnight). Clothing is packed by the day in large 2 1/2 gallon zipper bags and put in a larger bag (coordinating colors of course=). Each night before we go into the hotel, I grab the next day's worth of clothes, put it in the hotel bag with the PJs and the rest stays in the van.

3.Activity boxes (also see In the Car post with other travel ideas). For each road trip, we use these snap on lid boxes. Each kid has their own and it holds notebooks, crayons, MP3 players, money, travel games, etc. If they get new stuff on the way, have some leftover snack (IN a bag), they can put it in their space and it's not spread out all over the floor.
 4. Letterboxing. Before we take a roadtrip, I always go online and see if there are any letterboxes in the cities where we will be stopping. Letterboxing is fun and free! What you take with you: small notebook (we use a pocket size sketchbook), a small rubber stamp and an ink pad. You follow the clues to find the letterbox. Inside you will find a unique rubber stamp and another notebook. You stamp your stamp in their notebook and leave a short note (like the purpose of your trip and when you found it) and you use their stamp to stamp in your book and journal that as well. Here is one site with clues - Letterboxing North America
1. As a scrapbooker, it is easier to pick colors for the pages if the people I have pictures of are in similar colors (as my kids have gotten older, we no longer completely match, but we do try to coordinate in the same colors on the same days). So I pack the same colors in shirts for the whole family for at least the days we'll be taking the majority of pictures. This is also helpful, if God forbid, I should need to describe one of my children to a police officer. I know exactly what they were wearing.
2. Road trips. When going in and out of hotels each night in different cities, I don't want to take a suitcase for everyone in each night (nor is there usually room in the van for so many suitcases). So I have 1 suitcase for the kids and myself with pajamas, toothbrushes, medicines, etc. Anything we'd need overnight). Clothing is packed by the day in large 2 1/2 gallon zipper bags and put in a larger bag (coordinating colors of course=). Each night before we go into the hotel, I grab the next day's worth of clothes, put it in the hotel bag with the PJs and the rest stays in the van.

3.Activity boxes (also see In the Car post with other travel ideas). For each road trip, we use these snap on lid boxes. Each kid has their own and it holds notebooks, crayons, MP3 players, money, travel games, etc. If they get new stuff on the way, have some leftover snack (IN a bag), they can put it in their space and it's not spread out all over the floor.

In the car
Traveling with kids on long journeys requires some preparation to make it go smoother. Here are some ideas that I hope will help.

General tips
1. Instead of giving things out all at once, have a stash of travel activities that you dole out every 15-30 minutes. Inexpensive toys can often hold a kid's interest for 15-20 minutes before even the simplest thing gets old. (remember to plan a different set, or repack everything for the trip home).
2. Snacks. In your stash of activities, include snacks. Small pieces are often a better choice because it takes longer to eat. A snack size baggie of trail mix will take longer to eat than a breakfast bar that is chomped down in 4 bites. You might want to avoid chocolate just because it's messy (however, M&Ms in a trail mix usually go over pretty well with minimal mess). Snack size baggies of grapes, mandarin oranges, apple slices (dip in pineapple juice and they'll last a week in the fridge without going brown), pretzel sticks or carrot sticks with single size tub of peanut butter.
3. Be sure each child has a place to set their toys/trash when they are moving on to the next activity. We use the snap on lid boxes that have a handle on the lid. They are small enough to be stepped over, but big enough to store a lot of stuff.
4. Travel currency. When going on long trips, we (parents) decide how much money each child is going to get for spending money on the entire trip. We divided that by how many days we will be gone. We use poker chips to equal $1 each (each child has a different color chip). Each day the kids get the set amount of poker chips (make sure they have a coin purse or container to keep them in). If they want candy at a convenience store, they hand over a chip. If they disobey, hand over a chip. When we get to the actual destination (tourist spots, Grandma's house, whatever) they can spend whatever they have on keepsakes. If they don't have the "cash" to buy what they want, they don't buy it. They must earn it first. If they spent it on candy and sodas instead of eating the healthier snacks and water that we brought along, then they do without that "must have item" at the gift shop.
5. Keeping a record of where you were...postcards. As a scrapbooker, I like to journal what we do each day so that I can scrapbook the trip in chronological order when we get home. To help with this, I buy a postcard at each stop (wherever we spend the night). At the end of that day, I journal what we did in that location (spent driving, where we stopped to eat, amusement park,...) and then I actually mail it home (remember to take postcard stamps with you). When I get home or shortly thereafter, I have a day-by-day record of what we did.
Little ones
1. Crayola Wonder markers. These markers are fabulous! They only write on the special paper. They can be dropped on the car seat or floor, used purposely on the door or window, or even a sibling, and they don't leave a mark other than on their special paper or coloring book.
2. Magnadoodles. These draw and erase toys are flat and solid enough to not need a table to set them on.
Older kids
1. Games - Pack a game box for long trips. Think of things that can be played with just what you hold rather than what is laid down on a table (1-handed solitaire, travel bingo - buy or print your own with a different card for every member in the car, window cling tic-tac-toe)
2. Dice Games - you can even take dice games in the car if you use a "dice holder" to do the rolling with (you don't want those little things flying all over the car).
3. National travelers - print an alphabetical list of all 50 states. Make your chart so that each state (or it's abbreviation) is in a box on a grid leaving plenty of room to make marks inside the box). Each time you see a license plate from a different state than where you, put a hash mark in the state's box.
4. Map it. Print out a map for each child in the car and give them a highlighter. You can circle the day's destination with a red pen and each leg of the trip, the child highlights where they've been (but the red circle tells them where you're going).
Timeline
When we moved in to a new house, I found a space for almost everything. But by the time everything was put in cabinets and pictures hung on the wall, I discovered I had no wall space left for a timeline. Bummer, I really wanted one of those. So I mentioned (ok whined) to my husband that I didn't have any place for a timeline. He grabbed his keys, went to the local home improvement store and returned with the PERFECT solution.
He hung a fake bamboo roll up blind in our dining room window. It rolls up tight against the top and you don't even notice it's there when it's rolled up. But when it's down, it is the perfect place to put the timeline pieces. Instant timeline space for about $20.

He hung a fake bamboo roll up blind in our dining room window. It rolls up tight against the top and you don't even notice it's there when it's rolled up. But when it's down, it is the perfect place to put the timeline pieces. Instant timeline space for about $20.

Socks!
When my kids were little we seemed to have socks everywhere!
When they were still wearing socks with cuffs (that roll down at the ankle) we would mark each sock with a line about 1/4" long using a Sharpie marker. 1 mark meant it belonged to the oldest kid, 2 marks, 2nd oldest and as the kids handed down the socks we just added a line to show who it belonged to now. Every now and then we'd go over fading marks. But this really made sock sorting go MUCH easier.
Anything from the dryer without a match went in to the Sock Bucket (a wash tub or whatever container we were using at the time). Occasionally we would need a "time out" activity and someone would sort for a certain amount of time or until they had a specified number of matches. If the bucket started to get full and nobody had been on sock matching duty, we'd dump them in the middle of the floor and have races to see who could get the most matches in 5 minutes.

Again, when the kids were little and I was more concerned about their socks matching their outfit, I even put baskets into their closet and sorted the clean socks by color. Labeling the buckets gave the pre-readers some practice at seeing the color written in context with that color socks inside the basket.
When they were still wearing socks with cuffs (that roll down at the ankle) we would mark each sock with a line about 1/4" long using a Sharpie marker. 1 mark meant it belonged to the oldest kid, 2 marks, 2nd oldest and as the kids handed down the socks we just added a line to show who it belonged to now. Every now and then we'd go over fading marks. But this really made sock sorting go MUCH easier.
Anything from the dryer without a match went in to the Sock Bucket (a wash tub or whatever container we were using at the time). Occasionally we would need a "time out" activity and someone would sort for a certain amount of time or until they had a specified number of matches. If the bucket started to get full and nobody had been on sock matching duty, we'd dump them in the middle of the floor and have races to see who could get the most matches in 5 minutes.
Kid laundry
Teaching kids to sort laundry is a time consuming skill that takes practice. If we start when they are young, they won't end up wearing pink (supposed to be white) T-shirts when they leave home and go off to college. Doing laundry is something that kids can begin helping with at a young age and working up to doing it on their own.
To encourage my kids to sort their clothes as they took it off instead of waiting until laundry day, I put 4 hampers in their bathroom. Labeled with: red, white, dark and light.

Then instead of doing laundry just once a week, we make it part of our daily routine. The child in charge of the laundry zone (our chores are divided into zones) gets 1 hamper from the bathroom, adds any adult's clothes of that color to the bucket and then starts the laundry before breakfast. At lunch time the laundry person moves the clothes to the dryer, and before they play after school work is done, they are responsible to sort the clothes and lay neatly on the couch so everyone can put away their own clothes.

Organization - Kid cothes and shoes
It is often more cost effective to buy kids' clothes when they're on sale rather than waiting until they are needed. But if they don't fit someone right now, what do you do with it? I found it easiest to set up a storage system by size so that when one size was outgrown it could be passed down or passed on to someone else and then the next wardrobe was already ready to unpack without going through several other sizes at the same time. Big boxes can be stacked in closets and little ones can be put up high on shelves that are not used very often.
I buy at resale shops, yard sales, discount stores and occasionally big box stores (but almost always on clearance). Buying used or really cheap means I also do not feel too bad if some items don't get worn before they are outgrown. They are still in a condition that I could pass them on to a friend or donate to a charity.
For clothes:
I used Rubbermaid totes and labeled the size of the clothes inside. These stack neatly, are fairly watertight and heat tolerant (don't store things in the attic or outside that might melt or elastic that could become brittle).

For shoes:
Label the box with what size is inside. I always tried to have a pair of black dress shoes, white dress shoes, tennis shoes and sandals/flip flops in each box. No scrambling at last minute when someone's shoes do not fit and they need a bigger size (usually in the morning when we are getting dressed for church or to go on a field trip).

Angry Birds Party


12x12 cake trays made with scrapbooking paper and laminated with clear Contact paper before putting cupcakes on top.
Cupcakes put in bird/pig shape and then frosted as one piece to make a pull apart cake
Facial features made with marshmallow fondant (recipe from Pinterest)
Decorations:
*Paint birds on the window by enlarging pattern and hanging on the other side of the window. Paint solid colors first and then outline in black
* Print bird faces and put on balloons or balls
* Use Christmas ornaments made for outside (plastic) for black birds
* Bird colored streamers
* Large cardboard boxes or building blocks with stuffed animal pigs
* Plates - plain green and add paper snout and circle punches eyes, add eyebrows with permanent marker
Games/Activities
* Bird shooters and paper box pigs
We used bird colored pom poms for the birds
* Angry Bird Live!
Pig faces painted on large green T-shirts
Bird faces painted on red and yellow balls
Pigs climb on play structure and birds are thrown at them. After set time, switch places


 |
| Custom scrapbook by Wild About Scrapbooking |
Buzz Lightyear Party


Buzz!
Decorations:
Stars, planets, rockets
Mural for guests to take pictures with. (use an overhead projector and coloring book image to trace Buzz on a 5x7' piece of foam core. Then paint). In sample above, we also did 2 small aliens and cut them out so that kids could stand in front of Buzz but behind aliens. Every guest got a picture with Buzz and we sent those out with the thank you cards.
Food:
Star shaped cookies
Dehydrated astronaut snacks
Alien party mix
Cake - rocket or star shape
Activities
Laser tag
Star Command missions (scavenger hunt)
Star shoot (rubber end type dart gun at stars on the other side of sliding glass door or window)
Relay races from Star Command to a "planet" and back
Space frame (peel and stick space pieces on foam or wodden frames)
Dora the Explorer Party

Mural to take pictures with. Sample painted on 5x7' foamcore using overhead projector and coloring book. Trace picture with fine point permanent marker onto an overhead transparency. Project the image onto the foamcore, trace lines with a pencil or permanent marker then paint. Have guests take pictures with Dora and print those to go in the thank you cards.
Decorations:
Fiesta theme (piñata, streamers, bright colors)
Goodie bags (purple bags like Backpack from craft store):
- Sipper cups (Oriental Trading Company)
- Bracelets (yellow pony beads, blue foam flowers, white buttons) (*more detail below)
- Roll up coloring pages printed from Nick Jr.
- Dora stickers (OTC)
- Camera kaleidoscopes (OTC)
- Dora fruit chews (individual packets in the fruit snack isle of grocery store)
Activity ideas:
- Bracelets (blue flowers, white buttons, stretchy string, yellow beads)
- Have “kits” prepared ahead of time with just enough beads to go around child’s wrist. Let them string the beads and then tie them for a bracelet.
- Coloring Dora pictures printed from Nick Jr. (put bucket of crayons on table covered with a tablecloth)
- Pinata - burro shape or yellow star (check party supply places or make your own star)
- Scavenger hunt - follow a map
Food:
- Punch (Hi-C orange won’t stain carpet or clothes like red punch)
- Mexican finger foods like mini quesadillas (use cookie cutters to cut out stars), tacos, etc.
- Star shaped like Pinata
- Cupcake Pull apart – Grocery store bakeries will make 18-24 cupcakes into any shape you want and frost it all as one design. Then the kids just pull off the cupcake they want. You could do a piñata shape, star shape, or even Dora herself.
- Use solid color plates and napkins from dollar store instead of Dora print (pink, orange, yellow)
Bead bracelets
Use shaped hole punch to punch 2" flowers from blue Fun Foam. Put a dome topped white button through the center of the flower with the button shank pushing through to the other side. Run elastic string through the button shank (long enough to go around a child's wrist and be tied in a knot). Put the flowered elastic in a small container with enough yellow pony beads to fit around the child's wrist. Kids string the beads and an adult ties it off.
Big Game Review
Study just about anything! Nothing to study? Quote Scripture or sports trivia...anything! All ages can play together.
Suggestion: Have older students make up question cards from anything they need to study for an upcoming test (history, science, math equations...). They study while they make the questions as well as when they play the game. Cards can be kept and added to throughout the school year to be used as a weekly or quarterly review.
Each player answers their own question cards, so a high schooler might be answering biology questions while a 3-year-old sibling is naming colors when it's their turn.

From 1-8 players or teams. If you can answer questions,
you’re old enough to play!
Suggestion: Have older students make up question cards from anything they need to study for an upcoming test (history, science, math equations...). They study while they make the questions as well as when they play the game. Cards can be kept and added to throughout the school year to be used as a weekly or quarterly review.
Each player answers their own question cards, so a high schooler might be answering biology questions while a 3-year-old sibling is naming colors when it's their turn.

Big Game Review
(Study Game)
You can use any size/type game board, but if you want to
cover it, the supplies needed may be slightly different depending on the size
and shape of your board. The sample boards I’ve done are all square boards that
fold into fourths and go in a square box.
Supplies needed:
Square box game board (like Trivial Pursuit)
(4) pages of 12x12 paper for the game board background
(4) pages of 12x12 pattern paper for the squares to make the
track
4 different
designs or colors. Sample uses black solid and 3 patterns
Paper #1
(solid) – approximately 60 1 ½” squares
Paper #2 –
approximately 15-20 1 ½” squares
Paper #3 –
approximately 15-20 1 ½” squares
Paper #4 –
approximately 15-20 1 ½” squares
Extra paper for decorating the box
Adhesive for paper (won’t wrinkle paper – sample used Modge
Podge)
Clear Contact Paper (enough to cover the entire board)
Game tokens (like bingo markers from Oriental Trading
Company)
Container for bingo markers (mini M&M container or Mentos with flip up lid work well)
Single dice
Bonus – if your game board comes with a box to hold question
cards, cover that too:)
 Cover just one section of the
game board with Modge Podge
or other adhesive (thin layer;p just enough to hold it down).
Cover just one section of the
game board with Modge Podge
or other adhesive (thin layer;p just enough to hold it down).- Cover all 4 corners of the board in the same manner (making sure all 4 corners match up in the center).
- Press evenly to smooth out any bubbles.
- Once all 4 corners are down, snip off outside corners with scissors to avoid buckling.
- Fold trimmed edges over to the back of the board and glue down.
- Lay out your track using the 1 ½” squares. Solid color (Color #1) is just for making the trail and marking spaces. Color#2 is for answering a question card. #3 is for rolling again and #4 is for moving back 1 space (or whatever works for you).
- Once you have everything laid out where you want it; glue it down. No beginning and no end.
- After entire track is glued in place, use Clear Contact Paper to cover the entire board (going completely around each piece that divides in half when the game folds.)
- Once the board is covered, you can cover the game box, token holder, and/or card holder to match if want to.
Print directions for playing the game. Best to laminate this or stick it inside of the lid. You'll need to change the directions a bit to suit your game, but here is a sample:
Big Game Review
Needed to play:
Playing board, playing pieces, chips, one dice and
questions (or
agree what is to be used for the question spaces - could be as simple as naming a color)
Set up:
There is no beginning and no end. Players simply pick a blue
square wherever they would
like to start.
Determine the goal of the game (set a time limit or number
of chips needed to win)
Object of the
game:
To collect the most chips by correctly answering questions.
Rules for play:
1. Each
player rolls the dice; highest score goes first. Play continues around the
board clockwise.
2. In
turn, player rolls the dice and moves ahead that many spaces and acts
accordingly:
·
Blue spaces – no action
·
Red – answer a question
·
Orange – roll
the dice again and move accordingly
·
Green – move back one space
3. Answering
a question correctly earns the player a chip.
4. Play
until goal of the game is achieved (time limit or number of chips).
5. WINNER
is the person with the most chips at the end of the game.
Tuesday, June 12, 2012
Breakfast ice cream?
Bananas
Milk - just a little
Mix ins: peanut butter, chocolate chips, strawberries, nuts, ... whatever you want
Food processor
Peel the banana, cut into chunks and freeze for several hours (or overnight)
Put frozen banana chunks, tablespoon or so of milk and whatever else you want to mix in, into the food processor. Blend well.
Tastes like ice cream! No added sugar, nothing in there but you put in yourself.
Shhhhh - the kids won't know they're not sneaking ice cream for breakfast unless you tell them! =)
Sight Word Sliders
 Paint chips (sample cards - use large ones for more writing space)
White cardstock (to print on)
Laminate (best price usually at teacher supply store)
Hole punches - I used small square for "window" and slot to create the space on either side of window
1. Cut off any pre-printed writing from the paint chip (in this case, I cut off the end that gave the color number)
SAVE the part you cut off.
2. Punch a hole for the letter strip to show through (first letter of the word)
3. Write a word ending on each card
4. Print out letter strips on the computer or do it by hand giving several letters for each word ending (making the strips up instead of just using random letters helps to prevent unacceptable words from being created).
5. After printing out the list of letters, cut a small piece of paint color from the section you cut off of the big piece and glue it to the top of the appropriate strip. (student matches paint color on strip to the paint card word ending and then will know what strip to use with what word ending)
6. Laminate both the cards and the letter strips.
7. Cut out the letter strips and the paint chip cards.
8. On the paint chip cards, you can now use a slot punch to make a space for the letter strip to be slipped through (from top, under the laminated punched out window, and back through the front - the letters show through the laminated window from the back of the card)
Math Game Box
 Floss box
120 wooden hearts (that fit inside sections)
2 wooden circles (that fit inside sections)
Digital timer (optional - check the Dollar store)
Printed instructions for games
Colored Sharpie pens
Label box sections 1-10 (or to whatever number you'd like)
Put 12 hearts in each section
Number the faces of each heart to skip count by the appropriate number in each section
1s number: 1, 2, 3, 4, 5, 6, 7, 8, 9, 10, 11, 12
2s number: 2, 4, 6, 8, 10, 12, 14, 16, 18, 20
ect.
On the (2) circle pieces, put + and - on either side of one token and < and = on the other (can use a 3rd
circle and make multiplication and division pieces as well)
Color the edges of every heart in each section a different color (need 10 different colors of Sharpie)
Coloring them each a different color is helpful when putting them away; the smallest number of each color
tells student which section to put it back in. Then everything that color goes with it.
Print rules for a few different games on cards that will fit inside one of the sections. Examples:
1. Lay out each section from 1 to 10 in order with the 1's on the top row, 2s on the 2nd row... all the way to 10 (after this is done, show student how to use the grid to see what numbers are when multiplied together - find the 5 on the top and the 8 down the left side = where those 2 intersect is 40. 5x8 is 40)
2. Dump out the hearts from one section and turn them all over so you can't see the numbers. Set the timer for 30 seconds. When you push "start" turn over all the hearts and put them in order of smallest to largest. Then say all the numbers out loud from smallest to largest - you're skip counting!
3. Lay out 2 numbers and use the circle symbols with the < and = sign to show if one number is bigger than another or if they are equal.
4. Lay out equations and see which sign fits. Example: 2 (blank space) 3 = 5 (student puts in addition sign)
I spy bottle


Use a wide mouth, clear, plastic bottle (objects inside of bottle need to fit through the opening).
Scan or take pictures of every object you are putting in to the bottle.
Print 2 of each picture (this is your key of what to look for in the bottle)
Cut out the pictures (I used a circle punch) and glue them back to back with a loop of ribbon, as a "tag"
Put objects into bottle and fill almost full with birdseed
Use loops on pictures to hook them to a key ring that fits over the bottle top.
Use a good glue or epoxy to glue the lid on the bottle when you are done - no spilled seed:)
Keyring of what to look for can be easily removed leaving all of the bottle exposed for searching.
Options:
* Use little plastic animals for a "zoo bottle"
* Use theme items (like the Disney sample - I used Jibbits for Crocs) to make a theme bottle
* Collect small items on a road trip and create a memory bottle as you go. When you get home, take your pictures and then fill with birdseed.
Menu Planner - western theme
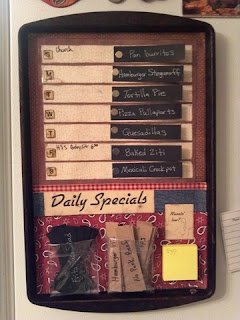

Base is an old cookie sheet.
Top section (menu and activities space) is laminated for use with wet erase marker
Bottom section has 2 pockets with 30 menu ideas each, and Post It note for shopping items to be added to the list.
Magnets hold the menu items to the board and bigger magnets hold the cookie sheet to the side of the fridge.
Summer Activities
It's HOT outside, here are some hot weather ideas...
* "Paint" with water on the sidewalk! Just get a container of water and a paintbrush and let the kids have at it.
* Puree and freeze fruit in popsicle molds (even paper cups with a craft stick will do)
* Water balloon fights
* Discovery blocks (freeze small plastic objects in a large plastic container - when frozen solid, set outside and kids chisel out the prizes)
*Scavenger hunt for "tickets" hidden around the house or yard. Use the tickets to buy water balloons from the "Cool off station"
*Toddlers - put ice cubes in the tray of a stationary saucer type toy. You can also put a little water in the bottom for their feet to splash in (there are usually holes in the bottom for drainage, so there won't be a lot of water accumulation)
* Toddlers - going to a sandy place like a beach or lake? Take a small blow up kiddie pool and put the toddler in there with some water (or not depending on the age). Little pool specifically for them stays clean longer than in and out of the sandy shore.
* Water tag - tape single squares of toilet tissue or facial tissue to the T-shirts of all players. Use water guns or squirters to "tag" opponents. When all of your targets are wet and have fallen off, you're out.
First Post
My first blog... wow. Hopefully soon this will be a resource place for parents and teachers.
With a background spent primarily with preschoolers, we needed a place to share ideas and activities relating to older kids. So you will find activities, recipes, tips and just plain fun stuff for kids of all ages.
Enjoy!
With a background spent primarily with preschoolers, we needed a place to share ideas and activities relating to older kids. So you will find activities, recipes, tips and just plain fun stuff for kids of all ages.
Enjoy!
Subscribe to:
Posts (Atom)