template

Tuesday, July 24, 2012

Kids eating healthy

Every parent knows kids need good nutrition to properly grow their bodies as well as their minds. Good foods help them do better at home and at school. But if you have children like mine, getting those healthy foods in to the kids is not as easy as it sounds. Given the choice, my kids will take the store bought (high sugar and low nutrition) cookies over something that looks like one of mom's healthy "treats."

So figuring out how to get more nutrition in to them has become a new hobby. We are by no means a "totally health conscious family" - but we are trying to make some changes for the better.  Here are some tips and ideas that I have recently discovered that are helping us make better choices:

1. Don't buy the junk food in the first place. If it's not in the house, it's not an option. Kids (or parents) cannot be tempted to eat what isn't there. (I am a coupon shopper, this may be more difficult for those looking to save money on "cheap" snacks - just keep in mind, those highly processed foods that have coupons save you money on the purchase price, but your kids may be getting exactly the nutrition that you pay for and that could cost you more long term)

2. Portion size. Most Americans do not realize what a "serving" should be. Just because it is in a single container, doesn't  mean we need to eat the whole package. Look at the label. Teach your kids to look at the label.  My kids were shocked to find out that the nutrition information (fat, sugar, carbs, calories...) were all based on a set amount. Those calories come from 15 potato chips, not the entire bag. There may be 2 servings in that can of soda or juice. When they ask for a snack they now understand they get "one serving" of whatever food it is they are asking for.

3. Have healthy snack options easily available. Make it just as easy to grab a healthy snack as it was to grab a bag of chips or candy.
        -Have individual portion size snacks available in the pantry and the fridge.
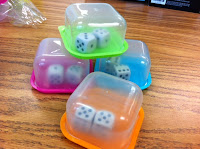
        -Pre-cut apple slices and put them in small containers covered with pineapple juice and water. They
          will not turn brown and they stay crisp for up to a week (we found straight pineapple juice affected
          the taste too much).
        -Make your own muffins and breads (with healthy ingredients) instead of buying donuts or high
          fat/sugar muffins. You can individually package them just as easy. And freeze them in Tupperware
          type containers. Just let them thaw on the counter or microwave for 10 seconds.
        -Make fruit smoothies and freeze them in popsicle molds (even paper cups and a craft still will do)
Frozen tropical fruit mix from Walmart, frozen strawberries, frozen blueberries, frozen bananas, about 1 cup of Pom Juice (and a hand full of spinach, but I'm not telling the kids:)

4. Help the budget by buying on sale. You can take advantage of the summer fruit deals and freeze them for later. It is usually easiest to clean the fruit, remove seeds, and basically make them ready to eat and then "flash freeze" them. Basically that means spreading them out on a tray and freezing them individually and then, after they are frozen, put them into a freezer bag or container. That way when you want just a few blueberries, you can take out a few without having to defrost the whole block.

5. Get the kids involved. I have one of "those kids". You know, the ones who would live on chicken nuggets and pizza. She has not eaten a vegetable voluntarily since the day she was born. But when we planted a garden (lettuce, spinach, green beans and peas), I started to discover the pea pods (shells) surrounding the garden when I went out to water. My picky eater was eating peas! She wasn't thrilled about the lettuce or green beans, but by golly she ate the peas. Next winter we will plant several:). This kid hates oatmeal and bananas. But this morning she offered to make banana muffins. Well, my recipe has bananas of course, but also oatmeal. She made the muffins, ate the muffins, AND said she liked them. Get kids involved in the growing and preparing of healthy foods and just maybe they'll actually like the end product.

6. Taste test - often. Repeated exposure will often help kids develop a liking. For years my picky eater wouldn't touch broccoli without gagging on it. Not dramatic, just a reflex, she's done it on any soft food since she was a baby. Then I realized, I was only giving it to her cooked. So I cut it raw. She was NOT happy with the texture of the florets either. Then a stroke of brilliance hit me, it's broccoli from top to bottom. So what if I strip the hard part off the stem and slice the inside of the stem like chips. It worked. She liked it. And she didn't choke on it. So now when I steam broccoli for everyone else, I peel the stems and 2 of my kids eat broccoli chips. Another mom suggested to me to take kids to a natural market and let them pick out things to taste. Or pick out a fruit like oranges and get several different kinds. By accident, this is how we discovered our love for Asian Pears. They have the sweetness of pears, but are crispy (not mushy for already identified picky eater).

7. Sneak in healthy foods where you can.
     -Pureed sweet potato or spinach in spaghetti sauce (use baby food if you don't have good blender)
     -Use applesauce instead of oil in baked goods (play with amounts, but I've used just applesauce in
       some recipes and they come out just fine)
     -Mix pancake batter in the blender and put in bananas or if you want pink ones, add strawberries
     -Offer grated zucchini as a salad mix in

I asked my homeschool group for ideas and here are some links for additional ideas and recipes
Deceptively Delicious
  I hear that the chocolate chip cookies (with garbonzo beans) are great and kid approved!
Green Smoothie Girl
Sneaky Chef


Monday, July 23, 2012

Completing projects

Sometimes big projects can be overwhelming for little ones. My statement of "clean your room" is totally a doable project for the born organized 15-year-old. She could handle the job, mostly on her own from the time she was 4. But for my more creatively thinking kids, that is an overwhelming request that will most likely deteriorate into tears and frustration within the first half hour. That is, if they don't get distracted and just start playing with something instead.

My solution has been to break down the job into smaller steps and then when possible, give them a visual to track their process.

In the example of cleaning their room, I might cut out a construction paper triangle and cut layers (like the old Food Pyramid idea). Put one area of their room on each section with "vacuum" being the very top triangle. Scatter the pieces on the table in the living room, out of the project area, and child finds the largest piece. It might say "make your bed" or "clean off the top and the floor under your desk." When that job is done, the child comes back to the table and finds the next piece up on the pyramid. Completing each job piece by piece gives some organization to the process and helps to guide a child who might not be able to get through the process on their own without getting distracted. For added incentive or structure, you can set a timer for 10-15 minutes. If the job is done before the timer goes off, the kid gets to play until it does. The job is still completed in the time frame you set forth, they are encouraged to stay focused for a short period of time, and they also get the mental breaks they may need to get it done.

We also use this sort of system with our younger kids when it comes to school work. Starting her day with a list of subjects to get through is overwhelming. She doesn't always have the same subjects every day either. But she is much more willing to stay focused and work if there is light at the end of the tunnel and she knows there is an end to it. So we use something like this...


All of the subjects she will work on were written on die cuts from the dollar store and backed with a small piece of magnetic strip so that they stick to the fridge. I got a magnetic pocket from a sale on school supply sales somewhere years ago. By adding a clipart basket to the front of the pocket, I've created a "done" basket. Each day I put the subjects that are on her assignment sheet on the fridge. Since I work with this child one on one while my older students complete their own work, I know what the actual assignments are. When we finish an activity or reading assignment she puts the correct apple into the basket. When all the apples are in the basket, she'd done for the day. 

You could also use this system for chores. Put each item to be done on a piece of paper or clipart image and  as the jobs are completed they are put into a basket or moved from one side of a chart to the other. Personally I like things like this on the fridge. It is out in the open and I can see someone's progress without having to interrupt and ask them what they're doing, what they've finished, or what they still need to do.

Friday, July 20, 2012

Ready for school

I was well on my way setting up this blog and getting several posts entered, when poof, it was almost time for us to start school again. So much for the grand plans I had for getting some things done this summer. But, we had a much needed time of relaxation and break from our regular routine. We can now begin a new school year with enthusiasm. As a homeschool mom here are some of the things I do to prepare for the new year...

Some of the supplies for 3 kids (huge pencils are Pringles cans that will hold some things for 1st day)

1. New school supplies.
Take advantage of the super sales that are offered now (and buy extra to replace or refresh supplies for 2nd semester). At the end of each summer I make a spreadsheet to compare which stores are offering what so I can get the best deals. Keep in mind that Walmart matches any price, so you can price match the lowest sale price at one store AND use a coupon on the same item (even if that coupon is from another store).

Top: Post It notes, boxes of pens, lined paper (1/3 of our stash)
Bottom: Sharpies, glue bottles and sticks, mechanical pencils
2.  Go through the library (home library)
As many homeschoolers do, we use a LOT of books. Being the Type A person I am, I need to have all (or most) of those books in my possession before I begin the school year.
*1 - I move all of last year's books back in to their storage space clear the shelves for the "current shelves" for the books we will use over the next 9 months. Go through the curriculum and make a book list. When the books are bought, they do not get shelved until I have logged them in to our book list. Yes, I have a list of every book we have (hundreds). That list allows me to mark who I loan books to as well as providing a reference that keeps me from ordering duplicates. It was quite a process to create, but not shelving books until they are logged in is key to keeping it current.
*2 - Mark the books for this year with a colored dot and put clear packing tape over it. This color-coding system easily marks each book for what year of the curriculum it is used. Once all books are purchased, each year gets easier to set up because we just gather all the same colored dots.
                      This is 1 year of Tapestry of Grace (not including math and science books)

3. Create schedules
*1 - I print out blank spreadsheets with 5 columns and as many rows as we need for our school day (typically each box is 30 minutes of time). I use 1 sheet per student starting with the oldest. Mark off any days/times that are not going to be used for school (weekly classes, weekly Bible studies, ... anything that happens every week that would affect school).  I write all of the student's subjects on separate 1x1 sticky notes and start placing them on the 30 minute sections (some will take 30 minutes, some take 60 which would be 2 boxes).
*2 - After completing the first student's schedule, I move on the next. The 2nd (and subsequent) schedules will need to be compared for when each student might need your attention. Do not double book yourself to help 2 or more kids at the same time.
*3 - After all kids have been done, I create a schedule for myself. This shows me when I am supposed to be where and when I have scheduled in time for me to do grading, take care of business (I run a home-based business as well as teach 3 grades).
*4 - After every sticky note chart matches up (or at least I think it does), I transfer everything over to a spreadsheet in the computer. This I print out and post on the wall as well as give each student one for their room.

4. Resource Folders
My kids were often needing to reference the same information throughout the school year (math charts, theories, Scripture we were memorizing, etc.) So I decided to give them one place to reference. This became our Resource Folders. For my youngest, it was where she learned her address, her birthday, my cell phone number. For the older kids it is where they look to remember a multiplication chart or an algebra formula. The base of the folder is basically 2 file folders glued together (think 'lapbook'). I go through their math, science, and whatever else I think they may need to know for the following year and print it up on the computer or copy it right out of their books. Attach everything to the folder and it's flaps and then laminate the whole thing so it lasts for the entire year.

Red folder has yellow flap added (sticking over yellow folder). Everything folds up into single folder size.

5. Plan for as much as possible (but be flexible - some things work and some things don't. Tweak as needed and move on). Consider things like:
- Do you expect/plan for them to do their work in a specific place? (we gave up on desks a long time ago)
- Do you need snacks or breaks to get through the day?
- Where will kids turn things in? (stacking on my desk does NOT work)
-Do you need a family calendar so everyone is on the same page each week?
-Are your schedules and goals realistic? Have you planned too much? Not enough?

This is what we are using this year. The Homework Caddy gives us a place to see the calendar, turn things in (and get them back without my tracking down each kid), see the schedule and even keep track of who is making breakfast on what day. The calendar is magnetic and there is a pocket (mine is yellow) to the right for pen storage. A large slide through pocket in the center allows us to post our daily schedule with a 4x6 pocket on either side. We have the breakfast cooking schedule to the left and a quote on the right reads, "I am a homeschooling mom. If you hear me talking to myself, please do not interrupt. I am having a parent/teacher conference." The 4 pockets on the bottom are labeled with 1 place to turn papers in and then I return them to each child's individual pocket.
Have a great year!!!

Wednesday, July 4, 2012

Travel Tips

Any time you travel with kids, it is good to think ahead. If you plan some activities and snacks for at least the time spent in the car, the trip usually goes a little smoother.

Things to consider:

1. How long will we be in the car each day? Depending on the age of kids, you might want to pack some goodies so they get something new every 30-60 minutes.

2. Have you looked at a map and thought about where the possible stops are? How long between stops? (good for everyone to get out of the car every 2 hours to stretch legs and move around a bit)

3. Do you have a beach ball or Frisbee or something else small that can be thrown around at a rest stop to encourage moving around?

4. Choose smaller size cups for preschoolers so you don't have to stop and find bathrooms quite so often. You might also try freezing water bottles 1/2 full so that all of the water isn't available early in the trip either.

5. For extra long trips, you might want to consider getting a portable DVD player and taking some favorite movies. (our rule of thumb was that the kids could pick a movie if we would be in the van for more than 3 hours at a stretch)

6. Older kids might enjoy doing some letterboxing on the way or at your destination city.

7. Car games - to keep dice from rolling around, put the required number of dice into a small clear plastic food storage container. Shake to "roll" the dice and set it upside down so you can see through the container what numbers were rolled. 

8. Give the kids a map so they can follow along. If you know ahead of time the stops you will make, you can mark those on the map and the kids can connect the dots at each stop.

9. Contain it!  Having lots of activities in the car to keep kids busy is great, but a hundred flying projectiles could be really bad if the car came to a sudden stop. Consider the items you are allowing kids to bring with them and consider a container with a lid so the activities that are not currently being used can be put away and contained.


This blog by Tip Junkie has some great ideas as well.